Home Sewing Machine Design
As a designer who’s digitized and stitched over 2,000 embroidery files—and reviewed hundreds more for craft businesses, Etsy sellers, and boutique apparel brands—I approached the Home Sewing Machine Design with quiet curiosity. Not hype. Not assumptions. Just the question: Does this hold up when it’s not on screen—but on fabric, under thread, in real hands?
I tested it on a natural linen tea towel first—then moved to a midweight cotton tote, a baby onesie (100% combed cotton), and finally a brushed cotton sweatshirt. Why those? Because they’re where small creative businesses live: kitchen goods, carry-all branding, newborn gifting, and cozy custom apparel. And that’s exactly where the Home Sewing Machine Design earns its keep—or doesn’t.
A Design That Whispers “Maker” — Not “Machine”
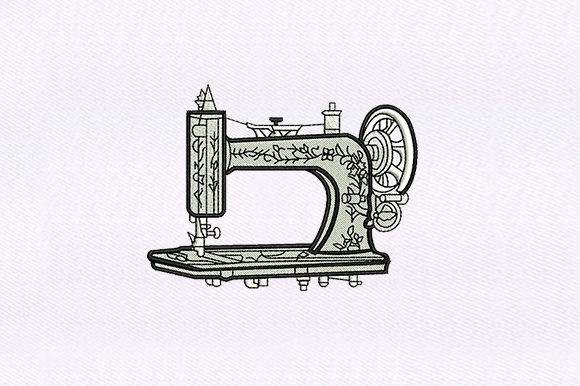
This isn’t a technical schematic or a cartoonish icon. It’s a stylized, hand-drawn–feeling sewing machine rendered in clean satin and fill stitches—with subtle curves, balanced negative space, and intentional line weight. The bobbin, needle, and spool all read clearly at 3.5 inches wide. No tiny floating parts. No fragile stems or micro-details that vanish in dense stitching. That matters—especially if you're stitching for a boutique that sells embroidered aprons to local seamstresses or handmade gifts to craft fair shoppers.
The mood is warm, nostalgic, and quietly confident—not flashy, not cutesy. It says “I sew because I love making things,” not “I own a gadget.” That resonance is why it works so well as a personalized gift or small shop product: it feels human-made, even though it’s a machine embroidery design.
Where It Shines (and Where It Needs Guardrails)
On stable, medium-weight fabrics—think tea towels, canvas totes, denim jackets, or pillow covers—the Home Sewing Machine Design delivers crisp definition and rich texture. The satin stitch outlines hold beautifully on cotton twill; the fill areas remain smooth without puckering, especially with tear-away + cutaway stabilizer combo. For an embroidered patch, it cleans up nicely with a merrow border or heat-seal backing.
But here’s what I noticed on stretchy or textured surfaces: on a ribbed cotton baby onesie, the top curve of the machine body softened slightly—still recognizable, but less precise. On a curved cap front? It worked only with a smaller version (under 3 inches) and heavy stabilizer. So yes—it *can* go on a cap, but only if you’re willing to scale down and test thoroughly.
Dark fabrics? Excellent contrast potential—if you choose high-visibility thread colors (ivory, mustard, or soft teal instead of charcoal gray). Thin fabrics like voile or lightweight rayon? Skip unless you add extra stabilizer and reduce stitch density manually. The design’s detail level assumes some fabric support—not sheer or slippery substrates.
Real Project Pulse Check: The Custom Tote Bag Launch
Last week, I used the Home Sewing Machine Design as the hero motif on a batch of organic cotton tote bags for a local sewing studio’s holiday pop-up. We placed it centered on the front, 4 inches tall, with a simple serif monogram below. Customers paused. Smiled. Touched the stitching. One said, “That looks like my grandma’s machine—but prettier.” That’s the sweet spot: nostalgic recognition, modern execution, tactile appeal.
It elevated the handmade product without overwhelming it. No one mistook it for mass-produced. That trust—built through clarity, proportion, and thoughtful digitization—is what turns a custom apparel item into a keepsake.
What This Means for Your Craft Business
If you sell digital embroidery files on Etsy, the Home Sewing Machine Design fits cleanly into themed bundles: “Sewing Studio Essentials,” “Maker Gift Sets,” or “Nursery & Newborn Collections.” Its visual personality supports cohesive branding—especially paired with coordinating motifs like spools, scissors, or floral thread skeins.
For physical product sellers, it adds instant storytelling to your tote bag design, sweatshirt embroidery, or apron. It signals expertise and warmth—not just skill, but care. That perception directly affects perceived value, repeat purchases, and unboxing joy.
And for holiday or wedding-related offerings? It’s unexpectedly versatile. Stitched in ivory thread on oatmeal linen, it reads as elegant nursery decor. In red and green on a kitchen towel? Joyful, thematic, and timeless—not trendy.
Practical Designer Notes Before You Stitch
- Always test on scrap fabric first—especially if using textured, dark, or stretchy materials.
- Check thread color contrast in natural light. What reads well on screen may disappear on navy or charcoal.
- Review stitch density. If your machine struggles with dense fills, consider reducing density by 5–10%—the design’s balance holds up well to slight simplification.
- Confirm hoop size. While not specified in the description, most versions of this design fall comfortably within a 4x4 or 5x7 hoop—verify before digitizing for production.
- Inspect small details in your embroidery software: the needle tip, spool grooves, and bobbin outline should be legible at your intended size.
- Test black-and-white mockups to assess silhouette strength—this design passes that test with ease.
- Use proper stabilizer: medium tear-away for stable cottons; cutaway + topping for knits or textured weaves.
- Confirm licensing terms before selling finished items or bundling the digital embroidery file—some versions allow commercial use, others don’t.
The Home Sewing Machine Design won’t solve every embroidery challenge—but it solves the right ones. It bridges sentiment and stitch. It supports storytelling without shouting. And for makers building a craft business, launching an Etsy seller shop, or curating a small shop product line, that kind of quiet reliability is rare. And valuable.
Use it where intention meets execution: on the things people hold, use, and remember.